Grilled Vegetable Chili

by Mary Papoulias-Platis

Post image for Grilled Vegetable Chili

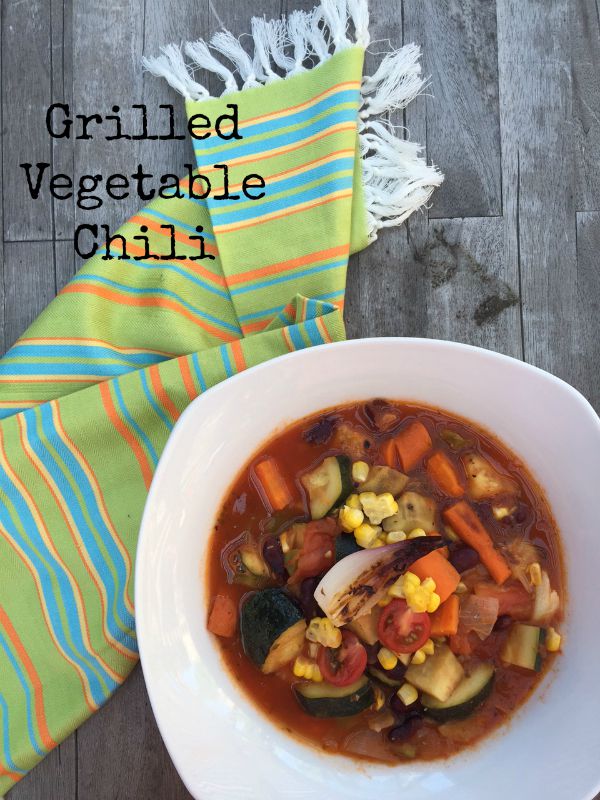
As we celebrate summer and grilling, I created this recipe, Grilled Vegetable Chili, to make at your next family gathering. The grilled vegetables can be made the day ahead, or grilled early in the morning. With a splash of olive oil and a hot grill you are all set. You can pick up steamed beans from Melissa’s Produce . These beans are steamed and ready-to-eat, so this chili takes a quick 30- minutes to get to the table. Pick up these beans at your local supermarket or online. Beans are a great source of protein and nutrients, so this dish is so hearty and healthy for your guests. If you like, you can use canned beans, or soak your fresh beans overnight and continue with the recipe.

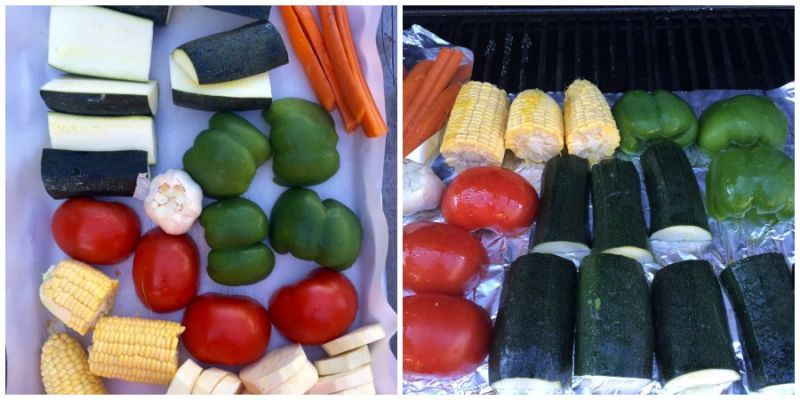
Once you wash and clean the vegetables just halve and place on the grill. I placed mine on foil, but your vegetable grill plate will work. Watch carefully, and turn as they brown. Cook 2/3 of the way through. Your vegetables will cook further in the chili.  Add a splash of olive oil and you’re good to go. Grill away!

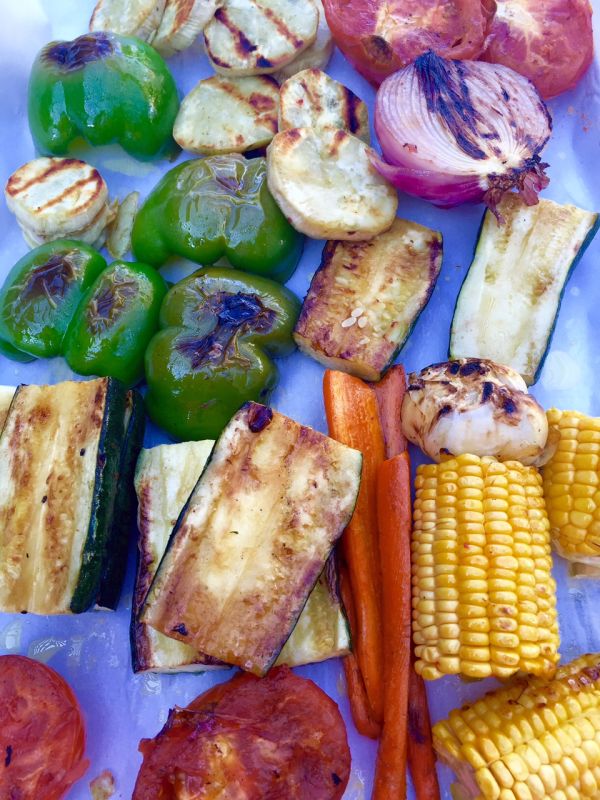
Once everything is grilled, remove and set aside as you prepare the chili.

veggies grilled

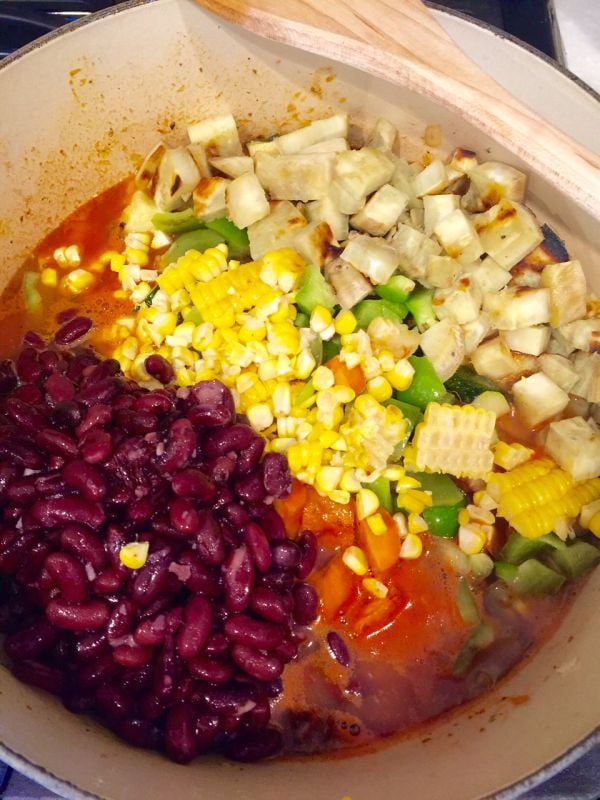
Pull out your a heavy pot and your ready to add the remaining ingredients, once done add your vegetables.

Chile Cooking

Stir and taste for added spices or salt and pepper. Keep on eye on it not to cook the vegetables too long. You want a crisp bright taste from the vegetables.

chili almost ready

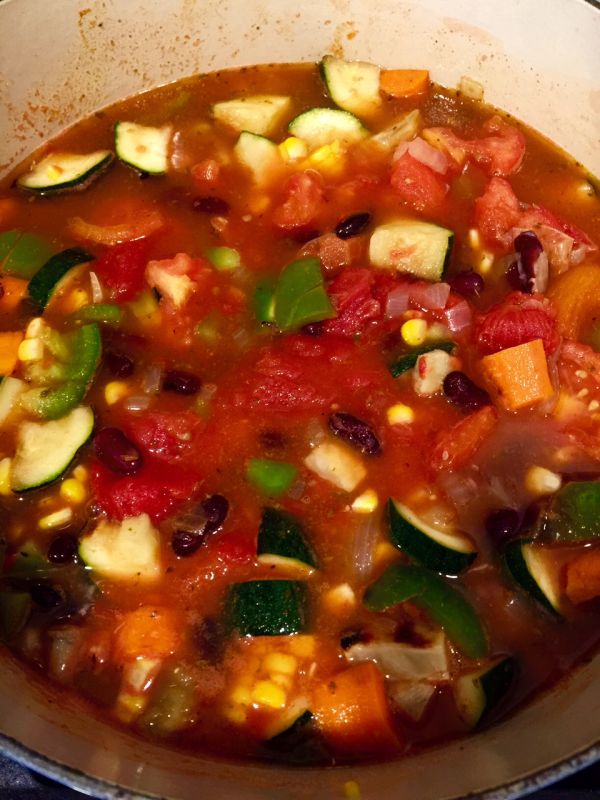
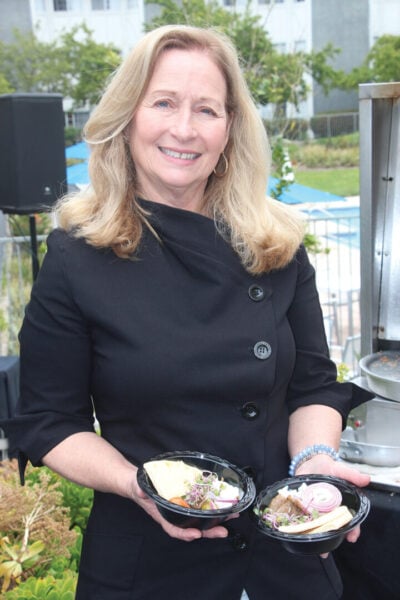
Top with grilled corn, grilled red onion, and fresh baby tomatoes.

Grilled Vegetable Chili

Get started on your celebrations for the summer and create this healthful grilled vegetable chili for your family or guests.

Course Main Dish - Labor Day
Cuisine American
Servings 6
Author Mary Papoulias-Platis

Ingredients

  • 1 pound red kidney beans, canned, drained and rinsed
  • 2 ears or corn, washed and cleaned (1/2 cup for garnish)
  • 2 zucchini, halved and quartered
  • 2 large tomatoes, halved
  • 2 green peppers, halved
  • 1 large sweet potato, peeled, sliced in round 1/4-inch thick
  • 2 carrots, peeled and halved lengthwise
  • 2 garlic bulbs, save one for garnish
  • 1 red onion, peeled and halved
  • 1-2 tablespoons extra virgin olive oil
  • 1 onion, diced
  • 1 28 oz. can of tomatoes
  • 1 8 oz. can of tomato sauce
  • 4 cups of water
  • 2 teaspoons oregano
  • 1 teaspoon cumin
  • 1/2 teaspoon cayenne
  • 2 teaspoons or more of salt
  • 1/2 teaspoon or more of pepper
  • 1 box of cherry tomatoes for garnish

Instructions

  1. Set the grill on medium heat.
  2. Prepare the vegetables for the grill. Wrap foil around the garlic bulbs for the grill.
  3. Place a vegetable grill or foil on your grill, and place all the vegetables on to cook.
  4. Drizzle with olive oil. Grill until vegetables are half-way cooked, around 15-20 minutes.
  5. Placed cooked vegetables on a sheet tray, allowing time for the rest of vegetables to cook.
  6. Roughly chop all of the vegetables. Peel the skin off of the tomatoes.
  7. Heat oil in a Dutch oven over medium heat. Add diced onion, and cook until softened.
  8. Add the spices, and cook for 1 minute.
  9. Squeeze one garlic bulb into the mixture and cook for an additional minute.
  10. Add the water, whole tomatoes (canned), and the tomato sauce, salt and pepper.

  11. Add the vegetables, all but the red onion, one garlic bulb and the cherry tomatoes.
  12. Stir and bring to a boil. Reduce heat and simmer for 30 -45 minutes until vegetables are cooked to desired doneness. (Check the potatoes, they take the longest to cook.)
  13. Top each bowl with one fresh cherry tomato halved, grilled corn, and thinly sliced grilled red onion.

You may want to try my other family chili recipes!

 Family Chili Recipe

Greek Chicken Chili

Happy Cooking!

Mary 

{ 2 comments }

Post image for Kalo Mina ~  Why All Greeks Wish This Upon You

Greeks have many beautiful sayings, especially words that greet friends, family and strangers. And Kalo Mina, is one commonly used today.

One of my favorite quotes is from the Greek Author, Nikos Kazantzakis as he writes that his grandfather in Crete, “…took his lantern each evening and made the rounds of the village to see if any stranger had come. He would take him home, feed him, give him a bed for the night, and then in the morning send him off with a cup of wine and a slice of bread.”

I began this post explaining this simple common greeting you may receive at the beginning of the month, but then I realized I could write a dissertation on the subject.  It goes all the way back to ancient history. Of course it does, and I promise I would never go back that far.

The first day of the month is important to the Greek culture. Greetings will be made among the locals throughout the day, in town and at home. It brings smiles to everyone, and begins the month with hope. Wishing someone well for the month, is extending yourself in the kindness manner.

Hospitality, (philoxenia), is taught from birth in the Greek household. Everyone is invited into your home, visitors including strangers. From morning till midnight. Why would you do this, you may ask? One old saying that stays true today is, ” If the pot boils, friendship lives”. For Greeks here in the states, food is an integral emotional part of their ethnic identity and one of their most satisfying traditions.

Easter with lamb

Believe me, my father would constantly bring home sailors in town from Greece, for dinner and show them all around San Diego for days.  As a little girl to be seen with a young clan of Greek sailors around town, wasn’t quite what people expected. I soon got accustomed to my dad and his friends. And yes, that’s me in the picture, around 6 years old.

Avocado Ranch

But even, The Greek Orthodox Church in town has a greeter today at the entrance of the church, welcoming visitors passing through. Many times after the Sunday church service, the ladies of the church would prepare coffee and sweets for everyone to enjoy. This still goes on today, when you visit our churches.

Uncle Mike downtown San Diego

In the city, it was expected that travelers would receive the same consideration as their fellow townsmen. Along with that, you may receive the “double kiss” on both cheeks as a common greeting as well! Watch out for the yiayias, as they go beyond the kissing, and squeeze your cheek until it bruises! One fond memory.

To all my friends and family, have a Kalo Mina!


{ 6 comments }

The Blender Girl Smoothies

by Mary Papoulias-Platis

Post image for The Blender Girl Smoothies

A while back I had the pleasure of attending Melissa’s Produce in Vernon for a book signing/luncheon featuring cookbook author, Tess Masters. We spent the morning, visiting, snacking and listening to Tess’ presentation, which was so entertaining. Wouldn’t expect anything less from her!  This is her second book that she has published called , The Blender Girl Smoothies.


After spending the afternoon reading the entire book, I realized how much healthful advice is in this book! I call it the “Bible of all Smoothies”, because she has nutrient-based recipes, tips, references, guides on all the recipes and everything you need to know to get your health back on the track!

Cookbook by Tess Masters

My favorite section of all my cookbooks is the author’s introduction in her new cookbook, The Blender Girl Smoothies. In this case it’s her Chapter 1, “smoothie secrets”.  Tess covers everything you need to know to be successful producing her recipes. I learned strategies, steps to spectacular smoothies, and to how to properly soak ingredients. One comment I found in the highlighted section on “smoothies versus juices” struck me by a surprise. In Tess’ weekly routine she, “Blends every day and juices every week.” She explains this in detail and should be read, if anything for your own information.

Did you know ?

  • There’s a correct way, an actual guide to “Building  your Smoothie”
  • You can add “Smoothie Enhancers” for creating easy healthful meals for yourself.
  • A Nutrient-Based Superfood list is included, to blend into your drinks.
  • A “Pantry” of ingredients to build on, including liquids, greens, herbs, spices and oils.
  • Looking for a flavor enhancer or sweetener. It’s in the book too!
  • Tess’ resource guide is a complete listing of her recommended companies to purchase your ingredients.

Summer is coming to an end with all our wonderful fruits and garden vegetables. And it’s also a time to settle in and get back to eating right. We have a tendency to be outside and eat on the run, especially on these hot long days.

At the event, Tess spoiled us by having 8 different drinks for our tasting. They all rang a bell with me. Some with a delicate spiciness such as the Gazpacho Grab, to the delicate flavored Raspberry Lemon Cheesecake. So, don’t pass up this handy but nutritional based book for your family enjoyment. Her book is available here.

Take a look at a bonus from her book: she labels each drink with symbols letting you know the health benefits of the drink! Couldn’t be easier than that! Thanks Tess.

Tess' Green Mojito


The Blender Girl Smoothies

Take a look at this green drink with many healthful benefits from Tess Master's new cookbook, The Blender Girl Smoothies.
Course Smoothies
Cuisine American
Keyword green drink, smoothie
Servings 2
Author Tess Masters

Ingredients

  • 1 cup coconut water or water
  • 1 teaspoon finely grated lime zest
  • 3 limes, peeled and quartered
  • 1 cup torn-up curly green kale leaves,1-2 large leaves, stalk removed
  • 1/2 cup firmly packed mint
  • 2 cups frozen pineapple
  • 5 drops alcohol-free liquid stevia, plus more to taste

Optional Boosters

  • 1 teaspoon wheatgrass powder
  • 1 teaspoon minced ginger
  • 1 teaspoon coconut oil

Instructions

  1. Throw all the ingredients into your blender and blast on high for 30-60 seconds, until smooth and creamy.

A big thank you to Melissa’s Produce, for this incredible vegetarian buffet which they provided for us during this event. Robert never disappoints us, or allows us to go home empty-handed. Boxes await us as we leave,  filled with fresh fruits and vegetables to take home for our families and explore with. Find their products at your local stores in the produce section.

Melissa's Produce with Tess Masters

Happy Smoothies!

Mary 

The event was sponsored by Melissa’s Produce, and they provided us with the book, vegetables and fruits.


{ 4 comments }

Zucchini Olive Oil Muffins with Berries

by Mary Papoulias-Platis

Post image for Zucchini Olive Oil Muffins with Berries

Every once in a while I’ll go through my old recipe box and pull out one of my favorite recipes. When late summer hits and the garden is producing a large amount of zucchini, I tend to rely on this fast and easy muffin recipe for my family.  I have just a small note on the recipe card – a good one. So, this time around I changed up the nuts from walnuts to slivered almonds, and added fresh summer berries and fruit. The figs are from my tree! Why not?

Here are a few health benefits from eating zucchini:

  • Great source of vitamin C, with only 21 calories per cup.
  • Provides Lutein and Zeaxantin two phytonutrients, a source of vitamin A.
  • Boosts your intake of manganese, an essential mineral.

Zucchini is so common in the summertime, often times too abundant!  Zucchini was always my choice of a squash to plant. We like to stuff them, braise them, and add them to our pasta dishes. This was also a wonderful way to use them up for a breakfast treat. My kids loved them fresh out of the oven. I would make the dough the night before and pop them in the oven – boy, the smell alone woke them up for school!

I also like to bake with extra virgin olive oil in my recipes. If you need more information on olive oil you can visit my olive oil articles on my blog. Also, if you are interested on more information take a look at my cookbook, Cooking Techniques with Olive Oil. 

BUY COOKBOOK HERE

Prepare your muffin tins with paper or coat the pan with oil. I tend to use a more mild olive oil, mostly from the spring harvest which comes from a more black olive for baking when using this recipe but, any extra virgin olive oil will do.

Have fun with it…it’s  summertime.

msummer muffins

Zucchini Olive Oil Muffins with Berries

Try these easy summer muffins for any occasion. Use what your garden, pantry or what you might have in your refrigerator. It's a great basic recipe, use your imagination!
Course Breakfast, Brunch
Cuisine California Greek
Keyword berry muffins, zuchinni muffins
Servings 12
Author Mary Papoulias-Platis

Ingredients

  • 3 cups grated zucchini
  • 1 1/2 cups extra virgin olive oil
  • 3 cups flour
  • 2 cups sugar
  • 4 eggs
  • 1/2 teaspoon salt
  • 1 1/2 teaspoon baking powder
  • 1 teaspoon soda
  • 1 1/2 teaspoon cinnamon
  • 1 cup chopped walnuts
  • 1 teaspoon allspice
  • 1/2 teaspoon nutmeg
  • Berries of your choice - Blueberries, Raspberries, or any fruit of your choice Raspberries, Blackberries or any fruit you desire

Instructions

  1. Combine grated zucchini and oil in a large bowl.
  2. Add the flour, sugar, eggs, salt, baking powder, soda, cinnamon ,nuts, allspice and nutmeg.

  3. Mix until blended. Do not overmix. Fill the muffin tins.
  4. Add the berries on top, (or any fruit) with a pinch of sugar.
  5. Bake at 350 degrees for 45 minutes.

Recipe Notes

This recipe can be easily halved. Makes 12.


zucchini muffins

{ 1 comment }

Post image for How To Make Garden Tabbouleh without a Recipe

Tabbouleh salad screams summertime in my house. Growing up it was a staple for all the fresh garden vegetables my mother grew. Not only is it a nutritional powerhouse, but it can feed a crowd at any outdoor party. I make my Tabbouleh from Bulgur wheat. But feel free to trade it out for quinoa, for a gluten-free dish. It is normally served cold with big amounts of fresh parsley, onions, tomatoes, lemon juice or red wine vinegar and a good quality extra virgin olive oil.

I buy my bulgur from Bob’s Red Mill which can be found online or at your local natural food store. It comes both in Golden or Red. Bulgur is often confused with cracked wheat. To make bulgur, the whole kernels are cleaned, parboiled, dried, and then ground into granules – fine, medium, and coarse. Fine and medium grinds need only to be steeped, while coarse grind bulgur needs to be cooked for 10 minutes. All grinds can be used in a recipe, but the cocking times needs to be adjusted. I used a coarse bulgar because I enjoy a more crunchy texture, so cooking time was 12 minutes.

Make your bulgur ahead of time, and cool. Add your ingredients of choice and you have a nutty-crunchy tasting salad to go along with your fresh salad, or alongside a protein. You can make a large batch of bulgur and keep it refrigerated all week to add to your soups, stews and salads.

Salad Bowl of Bulgur


Basic Cooking Directions

Combine 1 cup bulgur (I used coarse) and  1 cup boiling water and soak for one hour. This can be doubled.
Drain well and squeeze out any excess water.

Fluff with a fork.
Makes 6 servings.

Dressing the Salad

I use a good quality of extra virgin olive oil with red wine vinegar. You can use fresh squeezed lemon juice, if you like.

Coarsely chop all the vegetables and add to the cooled bulgur.
I add the olive oil and vinegar slowly to my taste.  Season with salt and pepper.

Vegetables

I used cucumber, fresh cherry tomatoes, red onion, bell peppers and 3 cups finely chopped parsley. (It’s all about the parsley!)
This is a more Mediterranean flavored dish.
Feel free to experiment by adding raisins, seeds, and nuts, and any seasonal vegetables of your choice.

my garden tomatoes

My garden tomatoes are just coming in. I make quite a few salads so I do love the smaller bite-size varieties.

Feed a crowd!

Feed a crowd this summer and double this recipe. It be made ahead, refrigerated overnight, and served cold. Oh yum!

Bob's Red Mill at Expo West

I met Bob at the Expo West show several times and he is such a great supporter to the culinary world. He has written this terrific book about his company and how he believes so strongly in his employees and supports them in so many different levels. By the way he also produces hundreds of terrific products.

Enjoy your salad and eat well!

{ 2 comments }

Pecan Pesto Butter Sauce

by Mary Papoulias-Platis

Post image for Pecan Pesto Butter Sauce

We are now in the full swing of gardening and summer cooking, and this Pecan Pesto Butter Sauce recipe is just perfect with pasta or my pork tenderloin. And when my basil is overflowing and it’s time for picking – I think of pesto. But this recipe is more of a butter sauce for your summer pasta salads, grains or BBQ meats. Learning this simple technique of Pecan Pesto Butter Sauce, you can design your own dishes with this incredible simple pesto sauce. Add it to pasta, salads, potatoes, lamb, chicken and the list goes on. I just can’t live without this sauce!

Pecan Pesto Butter Sauce

This recipe was found in my family recipe box from many years ago with the corners turned up, all stained with green basil spills. I happen to get invited for a cooking class as a guest at the local Herb Society Meeting in Rancho Santa Fe.

The chef made a large bowl of pasta and served it as her presentation. I loved that class and all the fine ladies I met that day. It’s one recipe I don’t make often (because of all that butter) but when I do make it, it takes me back to that friendly chef and how she gathered the pesto that day from her garden, and took us back into the porch area to make this amazing sauce. I remember taking vivid notes as if I was in class again. And that was a true farm to table experience before it became so popular like today!

That was over 20 years ago!

And to this day, I plant basil so I may have enough to make this memorable recipe.

Pecan pesto Suace

Why you should you plant basil:

  • Basil leaves compose of several health benefiting essential oils such as eugenol, citronellol, linalool, citral, limonene and terpineol. These compounds are known to have anti-inflammatory and anti-bacterial properties.
  • Contains iron. Vitmain A;beta-carotene, potassium and manganese.
  • Basil leaves hold many notable plant derived chemical compounds that are known to have disease preventing and health promoting properties.
  • Member of the mint family it has been used as a medicinal plant, and its oils and extracts are said to have antioxidant and antibacterial properties.

To begin always start with gathering all your ingredients.

pesto-mise en place

Measure and cut everything beforehand.

Pesto Blend

Blend in the food processor or mixer.

Pesto Butter

Place the pesto in a saucepan. Slowly add the cubed butter.

Pesto Final

Keep warm on lowest temperature until ready to serve.


Pecan Pesto Butter Sauce

Make this sauce for a special occasion with a big bowl of pasta, salad, and garlic bread and you will make many family and friends very happy! Or add it to your favorite BBQ meat.
Course dinner, sauce
Cuisine California Greek
Keyword pasta sauce, pecan, pesto sauce
Author Mary Papoulias-Platis

Ingredients

  • 1 1/2 cups basil leaves, washed and patted dry
  • 6 crushed garlic cloves
  • 1/3 cup toasted pecan pieces
  • 1/2 cup grated Parmigiano Reggiano cheese
  • salt
  • freshly ground pepper
  • 1/2 cup olive oil
  • 2 sticks of butter, cubed

Instructions

  1. In a food processor, fitted with a metal blade, combine the basil, garlic, pecans, and cheese.

  2. Puree until smooth. Season with salt and pepper.
  3. With the machine running, add the oil in a steady stream. Process until a paste is formed.
  4. Place the pesto in a saucepan, over low heat, heat the mixture.
  5. Whisk in the butter, a cube at a time, until all the butter is incorporated.
  6. Re-season the sauce if necessary.
  7. Set aside and keep warm.

Recipe Notes

This can be used on pasta, pizzas, or added to top chicken, pork, or meat dish.


The basic pork tenderloin recipe can be used for all occasions, changing out the sauce to cranberry for the holidays, oranges for the summer and so forth.

How to Cook Pork Tenderloin

Follow these few steps to serve a delicious pork tenderloin. Most tenderloins come with 2, which can serve up to 6-8 people.

Servings 4 to 8
Author Mary Papoulias-Platis

Ingredients

  • 1 pkg. pork tenderloin ( 2 in a package) Double sauce if using both.
  • 2-3 tablespoons extra virgin olive oil
  • 1/4 cup balsamic vinegar or sherry vinegar
  • salt and pepper

Instructions

  1. Pre-heat oven to 425 degrees.

  2. Using a large skillet, place over a medium heat and add olive oil.

  3. Pat the tenderloin dry with a paper towel. Sprinkle with salt and pepper on both sides.

  4. Add the meat to the pan, and brown the pork on both sides.

  5. Carefully remove from the heat and add the vinegar.

  6. Place the skillet in the oven, and cook until it reaches an internal temperature of 180 degrees. (well done) or 160 degrees (medium).

  7. Pull out of the oven, and cover to rest for 10-15 minutes.

  8. Slice into 1/2 inch slices and serve.

Enjoy your homemade pesto sauce and delicious dinner!

Mary 


{ 1 comment }

Post image for How Camp Blogaway Helped Culinary Students Gain Confidence

Have you ever wonder if it’s worth your time and effort to attend a new conference whether it’s in your town or in another city?

I have often asked myself that question repeatedly, especially right before pushing that “pay” button on my computer. Why is it so difficult to decide such an easy task?

I continue to contemplate the following questions over and over again in my head trying to make my decision.

Do I have the time and energy to attend?
How can I be productive?
Will I get anything out of going?
Will I have fun?
Do I know anyone there?

Well, I have attended several conferences this year and yes to my surprise I have thoroughly enjoyed every moment. I always try to take something away from the day or weekend, whether it’s finding a new brand, or feeling the energy from the innovative speakers, or just being brave enough to meet new people. And over time, I have embraced and loved the many wonderful relationships I have developed during these past few years.

The reason I’m writing this post for you today is for you to imagine what can happen unexpectedly in the days to come.

Christopher Davila Honorable Mention

For several years I attended Camp Blogaway, a food blogger’s conference, orchestrated by our hero Patti Londre from (Worth the Whisk).  I attended the weekend classes, not having any expectations on how the it would unfold. I wanted to enjoy a weekend with fellow bloggers, food representatives, and friends in a beautiful mountain-getaway without any noise. Just chatter and laughter was on my list for the weekend.

At last year’s conference I happen to sit at a table of new faces and met an incredible dedicated culinary chef Liz Thompson. We both had an idea at camp, and acted on it in the following months. Afterwards, we spoke many times on the phone coordinating our event. We both agreed it should start with the students at Liz’s culinary school.  The school was in San Bernandino, about 1 1/2 hours away.  I agreed to come out and do a presentation and olive oil tasting with Liz’s baking group. If there’s one thing I totally loose myself in, it’s teaching. I drove and drove that morning from San Diego and got there just on time. This took several hours of planning with Liz but it was all worth my time.

I was introduced to the young culinary students and began my presentation. Trying to keep it short and meaningful to these students, was my initial goal. They so surprised me! They continued to ask questions and thoroughly got into the subject. The best part of the day was when the students agreed to experiment with substituting olive oil for butter in their recipes. And they agreed to let me know how their process and recipes evolved.

Diana Cavazos Honorable Mention

Liz, the Chef and instructor then realized we should run a cooking contest using olive oil. I was fortunate to reach out and receive bottles from several olive oil companies; Bragg Olive Oil,  George Menzelos  from Arianna Trading, and Temecula Olive Oil. They were all generous supporters to provide the class enough oil to experiment with in their classrooms. Several months later the contest came to an end and as you can see the student winners were thrilled.

If you’d like more information on cooking with olive oil, you may want to purchase my cookbook below.

BUY COOKBOOK HERE

Mary Platis’ Cookbook

Such a small idea and gesture at a dinner table in the mountains with several food bloggers, became a winning idea.

jesus torres gonzales Third Place

If this gives you any inspiration to join and attend a nearby event – please GO!

Here are a few tips for you:

  • Start small, and attend a meet-up or talk in your coomunity.
  • Go with a stack of cards, intending to meet as many poeple as you can. But, be sincere.
  • Sit with new people and introduce yourself, try and move out of your comfort zone.
  • Attend smaller break out sessions where you can get more personal.
  • Be positive, because it does spread around the room.
  • Listen , listen, listen.
  • Be prepared and go with homemade cookies, snacks or drinks for a weekend conference and share.
  • Most importantly  – make new friends and follow up with an email.
  • And lastly, sit back and enjoy, and it will happen.

Just like it did this one time for Liz and me.

A BIG thank-you to our sponsors Bragg Live Foods, Arianna Trading, and Temecula Olive Oil.

Here is our group picture of all the Camp Blogaway attendees from this year!

Camp-Blogaway-2015-3549

And a special thank you to Patti for making this experience a possibility!

{ 0 comments }

How to Stuff Squash Blossoms

by Mary Papoulias-Platis

Post image for How to Stuff Squash Blossoms

Stuffing squash blossoms is quite new to the American Diet. In European countries this is a gardener’s delight. Every morning, we would go out and pick the blossoms for lunch that day. My aunts would stuff these dainty flowers with rice or a cheese mixture. Baking is preferred, but many choose to fry them in a very light batter.

Where to buy squash blossoms:

  • Natural Food Stores
  • European Markets
  • Produce stands
  • Local Farmer’s Markets

farmer's market squash blossoms

Clean the blossoms carefully to remove all the dirt and bugs. Set aside.
Mix your filling and set aside.

How-To Stuff a squash blossom

Carefully open each blossom and stuff with your favorite filling. (Rice, Quinoa, or Cheese).

Stuffing a squash blossom with cheese.

Lay in a baking dish and bake. Drizzle with olive oil and cover and bake for 10-12 minutes in a 400 degree oven.

Remove from the oven and serve as is with a light dressing or splash of olive oil. Or serve on top of a lovely salad.

Other uses for the blossoms: Add to soups, chop into tomato sauces, toss in salads, add to pastas.

Recipe with Cheese:
8-10 squash blossoms, gently cleaned
4 ozs. goat cheese, small package
1 teaspoon finely chopped chives
3 fresh basil leaves, finely chopped
salt and pepper
olive oil

Preheat the oven to 400 degrees.
In a small bowl combine the cheese and herbs.
Place blossoms on a pie plate and drizzle with olive oil. Sprinkle with salt and pepper.
Cover and place the dish in the center of the oven.
Bake for 10-12 minutes. Serve immediately.

It’s a summer delight!

Mary 


{ 6 comments }

Post image for Poached Mushrooms In Olive Oil with a Tart Recipe

This Poached Mushrooms in Olive Oil recipe was discovered when I had a box of mushrooms, that I had to use up immediately in my refrigerator. I was teaching a class soon on poaching with olive oil and was hoping I can come up with a mushroom topping that was unique. This took no time at all, and the mushrooms were fragrant with the addition of the rosemary. Poaching is a chapter in our cookbook, so I’m always curious what else I can poach? Yup, I poached the mushrooms and they were delicious. If you don’t like rosemary, try any other herb you may have, such as thyme.

Here are a few ways to incorporate these mushrooms in your dishes:

  • Make a mushroom tart using sauteed onions or leeks and a goat cheese base.
  • Add to your pasta salads, pizzas, and grilled cheese sandwiches.
  • Serve as an appetizer with toasted bread.
  • Make a crostini with goat cheese and chopped mushrooms on top. Drizzle with oil.

Mushroom Variety

I chose baby portobello mushrooms and buttons. But you can choose any mushroom that can stand up to being poached.

Mushroom Tart

Poached Mushrooms in Olive Oil with a Tart Recipe

I made these mushrooms for a topping in a cooking class I taught. They are so fragrant poached in a good quality extra virgin olive oil. I've included the tart recipe with the poached mushrooms as a topping. Or just serve the mushrooms alone as an appetizer.
Course Appetizer, mushrooms, olive oil, Side Dish
Cuisine American-Greek, Greek
Keyword mushrooms, phyllo
Servings 6 -8
Author Mary Papoulias-Platis

Ingredients

Poaching

  • 2 lbs. button and mixed mushrooms, washed and stems removed
  • 1/2 cup or more extra virgin olive oil
  • 1 sprig of rosemary
  • 2 leeks, washed and thinly sliced in rounds

Filling

  • 16 oz. goat cheese, room temperature
  • 1/4 cup milk
  • 2 eggs
  • 1/4 teaspoon pepper
  • 1/4 cup parsley, chopped
  • 1 tablespoon fresh thyme, chopped

Tart with Phyllo

  • 1/2 lb. phyllo dough, defrosted (1/2 box)
  • 1/4 butter, melted

Tart with Puff Pastry

  • 1 package of puff pastry, defrosted

Instructions

Poaching Mushrooms

  1. In a large straight-sided skillet place pan over medium- high heat, bring the olive oil to a slight simmer and reduce to medium. Do not boil.
  2. Add the mushrooms and thyme, cook until exterior of the mushroom softens, about 4 minutes.
  3. Remove and place on a paper towel lined plate to drain. Set the oil aside.
  4. As an appetizer, place the mushrooms in a bowl and drizzle the poached oil on the mushrooms and serve.

Tart

For phyllo

  1. Butter a 1/2 sheet pan (9x13) with butter. Add one phyllo sheet and brush with butter. Continue with all the sheets, buttering after each layer.

For puff pastry

  1. Open 1 sheet carefully, and place in the sheet pan. If needed gently spread the dough to the edges.
  2. In a small bowl combine the cheese, milk, and eggs and pepper. Spread over phyllo .
  3. Add the mushrooms and leeks.
  4. Bake at 350 degrees until phyllo/ puff pastry is slightly brown around 15-20 minutes.
  5. Top with the parsley and thyme. Sprinkle with extra virgin olive oil.
  6. Cut into bite-size pieces and serve warm.

poaching mushrooms

Poaching is a creative cooking technique to bring out the flavor of the ingredients your cooking as well as the flavors of the olive oil. Use a high quality extra virgin olive oil when poaching. Or try a infused oil for a unique added bonus to your flavors.

You may enjoy my cookbook for further recipes on olive oil.

ORDER COOKBOOK HERE

My Cookbook, Cooking Techniques with Olive Oil


{ 6 comments }